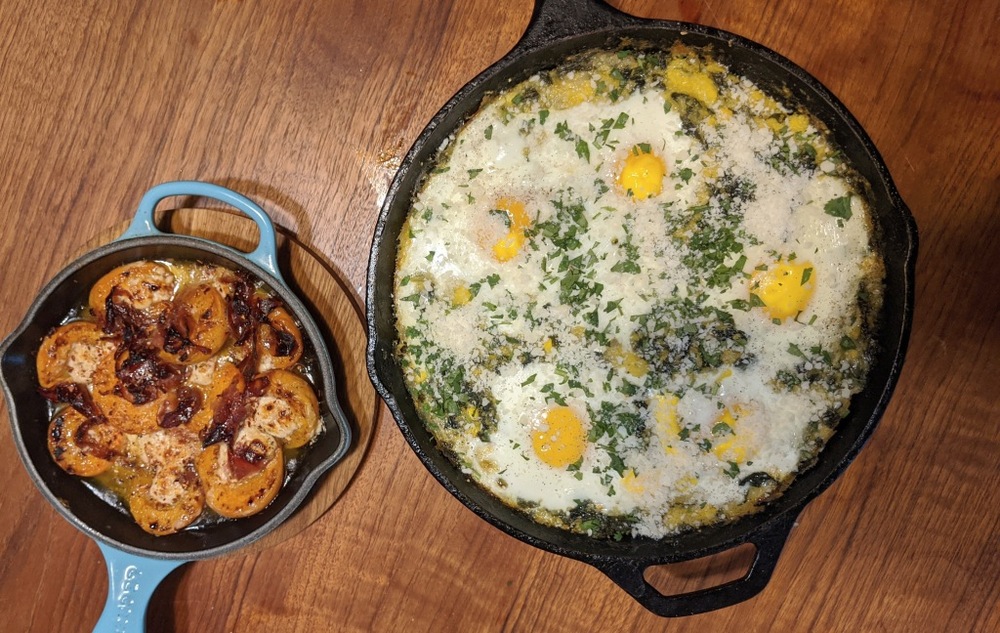
Cooking Fresh Beans

10 Nov

Every year I grow a few varieties of fresh shelling beans, and when I’m lucky I find them at the local markets as well.

A common even weeknight-fast way of cooking them is to combine beans, salty water, a splash of olive oil, some aromatic (half an onion, a shallot, a clove of garlic), a whole dried hot pepper pod (without seeds if I want it to be less spicy), and a bay leaf.

IMG_20191003_194011

Just low-simmering this combination for 25-45 minutes until creamy-soft (time depends on the particular beans, their size, and their maturity) and then draining and dressing with good olive oil is consistently delicious.


Cooking Dry Beans

10 Mar

IMG_20191008_203022.jpg

IMG_20190310_202652_940IMG_20190310_183228

Cooking dry beans? How boring and simple a concept is that?

I just cooked some great dried-but-not-old beans (Good Mother Stallard beans from this summer’s back yard garden, picked once the pods got papery and brittle and just stored in a mason jar), so I’m jotting down a few notes.

I didn’t soak them overnight. I covered them with a few inches of water, fairly heavily salted (a palmful of salt, such that it actually tastes like salty water, though not seawater), added a spoonful of olive oil, a whole peeled shallot, and maybe 1/2 tsp each of mustard seed and fennel seed.

Then I brought them to a very low simmer and let them cook uncovered… they took just under two hours to be creamy-soft and delicious.

A few months later, I cooked some larger Akahana Mame and Shirohana Mame dried beans from this summer’s garden, with a similar approach (plus a four-hour pre-soak), and they took about four hours to be creamy-soft and done (the Shirohana Mame were ready at three hours).

On the other hand, cooking similar dried beans from last year’s garden took almost six hours, even with some pre-soaking, so it seems to depend  how old they are (and perhaps how dry they got before being picked?)

IMG_20191226_195406_259.jpg


Pizza on a Charcoal BBQ

18 Nov

(quick notes, mostly jotted down to remember what worked well)

My third try in three years, and the most successful (I got the grill up to 700 degrees, which I’m sure helped):

IMG_8469

Grill setup: plenty of charcoal below, all air passages cleared of ash, and a pizza stone (porous side up for my glazed/porous stone) raised on two bricks to bring the pizza close to the hot lid of the ceramic grill. I let the charcoal burn for 90 minutes with the lid closed to get the entire grill up to 650-700 degrees (when I tried making a pizza earlier, it burned on the bottom before it fully cooked on the top– I think because the ceramic grill lid wasn’t hot enough– I could also try further raising the stone next time).

IMG_20181103_173221

The dough recipe is down at the bottom. After letting it rise overnight in the fridge, I pulled it out about an hour before the grill was ready and rolled out each crust on a floured board before transferring it to the peel (on a layer of coarse cornmeal), rubbing olive oil into it, sprinkling a little salt onto it, and then topping it.

IMG_20181103_171743

Each pizza only had to bake for 3 or maybe 4 minutes when the grill was at peak temperature (later in the evening the charcoal burned down and the grill dropped to 500-550 degrees– the pizzas still came out pretty well).

IMG_8463

IMG_8470

IMG_8471

IMG_8473

We made 6 different pizzas in one evening for a small cocktail party with a group of friends– success!

Dough recipe (6 small pizzas, enough for 6-9 people):

  • 690g white* flour
  • 255g whole wheat flour
  • 21g sugar
  • 15g salt
  • 15g yeast
  • 690g lukewarm water
  • 48g olive oil

(*usually King Arthur bread flour, but this time I used a 50/50 mix of bread and all-purpose because I ran out of bread flour)

Mix all the dry ingredients except the yeast.

Make a small depression in the middle of the dry ingredients and add the yeast there.

Gradually pour the water/oil mixture into this depression, stirring in a small circle to dissolve the yeast and to gradually incorporate the flour into this.

Turn the (quite wet and sticky) dough out onto a floured countertop and knead a dozen times.

Place in an oiled bowl, cover with plastic wrap, let rise overnight in the fridge (take it out at least 15 minutes before making pizzas and divide it into 6 balls).

Polenta from Home-grown Corn

7 Nov

(from July when fresh beans were in season) Once you have jars of colorful flint corn on the counter, you look for things to do with them… what about fresh red-and-blue polenta, with slow-cooked dragon tongue beans and boiled fresh shelling beans (both also from the garden), a fried egg, and a fresh corn and tomato salad?

IMG_20180705_201107 (1)

Even if my favorite use of dry corn has been cornmeal pancakes, soft polenta is a nice part of a low-effort but several-hour dinner, and something I make a few times a year.

I started with 3/4 cup of dry kernels and ground them into a medium-fine cornmeal (about 1 cup). I boiled 4 cups of water with a little salt, whisked in the cornmeal, brought it briefly to a boil, then reduced it to a low simmer (adding water once when it seemed to be drying out). About an hour later, it was ready to eat, and I melted in a pat of butter.

The dragon tongue beans fresh from our garden are honestly nice just blanched and very briefly sauteed in oil with a torpedo onion or shallot, even if this time I took the more time-consuming slow-cooked vegetable approach.

IMG_20180705_173101

Winter Squash with Cardamom, Tahini, and Lime

31 Oct

My recent favorite way to eat winter squash is from the recipe in Ottolenghi’s Plenty, and a recent harvest of kabocha squash from our garden was a good excuse to make it again. The unexpected combination of roasted squash, fresh limes, tahini, and cardamom is remarkable:

IMG_20181030_191608

IMG_20181030_190037_857

Preheat the oven to 400.

Start by peeling two limes (removing the pith and skin as well), slicing into rounds, and quartering (see the size in the photo above). Set them aside with a few pinches of salt and a drizzle of olive oil.

Peel the squash, remove the seeds, and slice it into thin slices. I used half of a kabocha as part of a hearty dinner for two. Grind 1 Tbsp (!) of cardamom seeds, a few allspice berries (or 1 tsp of allspice), a pinch of salt, and mix with 3-4 Tbsp of olive oil. Toss the squash in this, lay it out on parchment paper on a baking tray, and roast for 15-20 minutes until soft.

Mix 1/2 cup of yogurt, 2 Tbsp of tahini, 1 Tbsp lime juice, a pinch of salt, and a few Tbsp water (enough to thin the sauce out until it’s thick but you can pour it).

Lay out the squash, the lime sections, drizzle with the yogurt sauce, and garnish with cilantro and a thin-sliced serrano pepper.

Corn Muffins 5 Ways (from Backyard Corn)

23 Jun

(from last winter) What do you do when you grow five different varieties of colorful heirloom corn in the back yard?

IMG_20171028_172409.jpg

Grind them into cornmeal and make individual corn muffins, of course:

IMG_20180104_214506.jpg

Some day I’ll type up some notes on the corn growing itself– it was very fulfilling and an interesting challenge (especially the hand-pollinating due to the small area under cultivation and desire to keep separate varieties from cross-pollinating).

We couldn’t really taste a difference between muffins made with different corn (as expected, I suppose), though in a blind taste test H and I did both pick out the muffin made with Oaxacan Green corn as our favorite and a bit “nuttier” than the others… and we tasted a big difference between our freshly-ground dried corn (any variety) and cornmeal-from-a-box.

Vin d’Orange

15 Jun

I’ve had Vin d’Orange in restaurants as an apertif a handful of times, and only really knew that it was a tart, slightly bitter, orange-flavored wine (citrus + bitter: right up my alley).

Then earlier this year I read Samin’s description of making it and was inspired, during the brief window with sour Seville oranges were available at Monterey Market:

IMG_20180106_151701

After 40 days soaking a mix of rose wine, a little vodka, sugar, a whole vanilla bean, and sour oranges (tasting every few days), it was nicely bitter, and I strained and bottled almost 12 bottles of it.

IMG_20180107_133231

This gave me an excuse to buy a wine bottle corker, heat-shrinkable capsules to cover the corks, and with H design a label:

IMG_20180304_162650_595 (1).jpg

I even made a small pint-size batch with the three Chinotto sour oranges we harvested from a container-bound backyard tree:

IMG_20180107_135302

After another 4 months aging in bottles it’s starting to develop– the initial bitterness has mellowed and it’s nice to sip / feels like it wakes up the taste buds. There is still a bit of bitter aftertaste a minute after you stop drinking it– but I’ve read I may want to let it age a full year or more to really come in to its own. I can be patient… I’m drinking some two-year-aged pluot cordial now…


Garden Frittata

10 Jun

Frittatas are my current go-to for an easy, satisfying dinner incorporating a lot of greens and whatever else is in the garden (it also makes great next-day leftovers, cold):

This particular evening I caramelized onions and fresh garlic (low heat, 15+ minutes?), sauteed morels in butter, and wilted chard and kale (cutting out the stems first and cooking them for a bit longer so they would soften). If I’m not in a hurry (e.g. already very hungry) I usually cook the components separately even though it dirties another pan or takes some extra time–  everything takes a different amount of time to cook well.

I pre-heated the oven to 375, and layered the (aliums, morels, greens) in the same cast iron skillet I used for the onions.

I whisked 8 eggs with salt and pepper and a little milk for several minutes / until very frothy and poured them into the skillet, then cooked this stovetop for 5 minutes or so to help brown and set the bottom (it’s not clear this is even needed– it’s just a force of habit).

Finally, I laid some big chunks of a soft cheese like goat chevre across the top and popped the whole thing in the oven for another 15-20 minutes, until the eggs puffed up and set.

IMG_20180516_190953_808

img_20180603_1333554777565611569415383.jpg

Artichokes (Grown, Blanched, Grilled)

4 Apr

Last spring I started some Colorado Star purple artichokes from seed and transplanted them into a strip of soil along a driveway. They started slow and didn’t produce any fruit last year, but here I am a year later:

While I’ve simply-boiled some later harvests (three rounds so far this spring) I cooked a first harvest of baby-size artichokes with an “oil and water” hybrid blanching method inspired by This Is Camino— simmering them in batches in a single-layer half-covered in water (with garlic, bay leaves, herbs, and olive oil) until mostly done, then finishing them on the grill while straining the liquid and reducing it to a sauce that reinforced the artichoke flavor:

Carrot Top / Pistachio Pesto

26 Feb

I thinned some carrot seedlings out of the backyard garden to give other carrots room to grow… and remembered I’d heard of carrot top pesto. Indeed, the leaves plus green garlic tops from the garden, olive oil, pistachios, salt, and a little bit of parmesan cheese made a nice nutty pesto.

We ate it tossed with pasta, some 2-minute-blanched peas (some from the garden, some from the store), and spigarello sauteed with the baby carrots and garlic from last summer’s harvest.