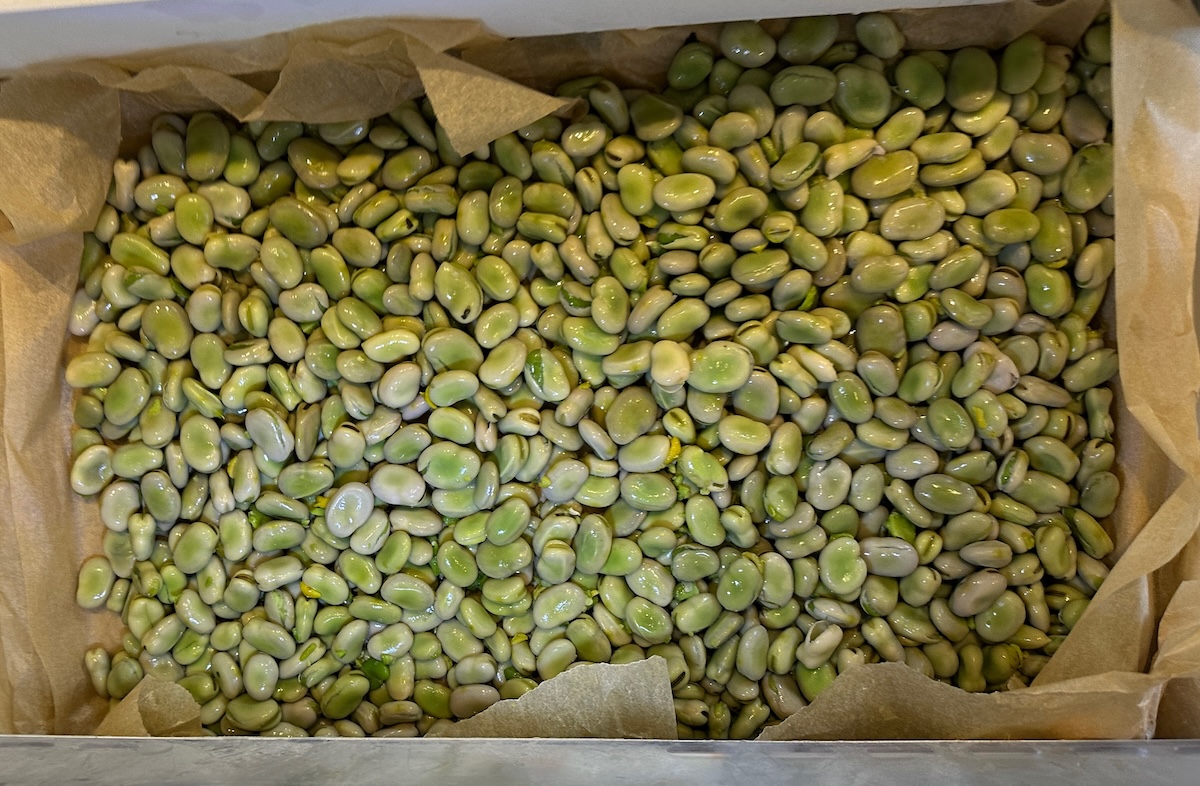
Archive | preserving RSS feed for this section

Vin d’Orange

15 Jun

I’ve had Vin d’Orange in restaurants as an apertif a handful of times, and only really knew that it was a tart, slightly bitter, orange-flavored wine (citrus + bitter: right up my alley).

Then earlier this year I read Samin’s description of making it and was inspired, during the brief window with sour Seville oranges were available at Monterey Market:

IMG_20180106_151701

After 40 days soaking a mix of rose wine, a little vodka, sugar, a whole vanilla bean, and sour oranges (tasting every few days), it was nicely bitter, and I strained and bottled almost 12 bottles of it.

IMG_20180107_133231

This gave me an excuse to buy a wine bottle corker, heat-shrinkable capsules to cover the corks, and with H design a label:

IMG_20180304_162650_595 (1).jpg

I even made a small pint-size batch with the three Chinotto sour oranges we harvested from a container-bound backyard tree:

IMG_20180107_135302

After another 4 months aging in bottles it’s starting to develop– the initial bitterness has mellowed and it’s nice to sip / feels like it wakes up the taste buds. There is still a bit of bitter aftertaste a minute after you stop drinking it– but I’ve read I may want to let it age a full year or more to really come in to its own. I can be patient… I’m drinking some two-year-aged pluot cordial now…


Fermenting Fridge

21 Jan

This barely counts as a project because of how simple it was.

I wanted a fridge I could use for homebrewing in hotter months (keep beer at 60-70F, or cider at 50-60F), that I could use to homebrew lagers for the first time (control temperatures in the 35-55F range at different stages of fermentation), to slowly lacto-ferment vegetables (not really necessary, but to do longer, slower multi-week ferments around 60F even when it’s warmer), or even to retard bagels (rest in a cool place overnight to slow yeast growth while allowing lactobacilli a head start).

I’d read a bit about DIY ways to replace the thermostat on a conventional fridge… and then dug up a much easier way.

img_7744I bought a Danby DAR044 Compact Refrigerator (price varies, about $180 when I bought it) and an Inkbird Temperature Controller ($35).

The Inkbird temperature controller is a simple pre-wired alternative to custom temperature control relay boxes many people build– it has a temperature probe and two outlets, and turns on whatever’s plugged into the “heating” outlet whenever the temperature is below a certain setpoint, and turns on whatever’s plugged into the “cooling” outlet whenever the temperatures above a different setpoint.

I just plugged the mini-fridge into the “cooling” outlet, with the temperature probe threaded up through an existing hole in the back rear of the minifridge that leads into a drip tray. You remove these two screws to remove the drip tray:

img_7740

And use a drill to slightly enlarge the drip hole from the outside and fish the temperature probe up into the fridge:img_7742

That’s it. It just worked.

It worked so well I set up a second fridge, so I could be fermenting beer or pickles in one (at 60-65F) while lagering or long-term storing fermented vegetables (or keeping beer cool) in the other at 35F.

IMG_20170312_162800.jpg

As one example, here’s the temperature of the fridge over the course of brewing a lager– at 55F for the first few weeks, raised to 65 for a few days, then lowered to lagering temp at 35…

screen-shot-2017-02-26-at-7-38-08-pm

And typical contents: fermenting chiles, preserved lemons, and sauerkraut:

img_20170108_185232

Quick Pickled Radishes w/ Lemon Zest

3 Jan

IMG_20180103_192851I’ve made quick pickles many times– usually just soaking thinly-sliced vegetables in vinegar, but this simple variant turned out especially well so I’m jotting it down.

I started with a daikon and some sort of purple Japanese radish from the winter garden:

IMG_20180103_185153_1

I sliced them thinly and tossed them with a few tsp of salt, massaging/mixing them with the salt again after 5 minutes. After about 10 minutes the salt had drawn a large amount of moisture out of the radish slices, and I quickly rinsed them and patted them dry.

I then covered them in a little white wine vinegar and Meyer lemon zest and let them sit another 20 minutes. Voila! A nicely supple texture (firm but not as crunchy as a raw radish), fresh and tart with minimal bitterness.


Growing (and pickling) Mouse Melons / Cucamelons

31 Jul

Back in mid-February I started some mouse melon seeds indoors under a grow light. Within a few weeks:

IMG_20170305_115005

Six weeks later, they were reaching out to grab onto anything nearby:

IMG_20170327_193317

Finally in mid-April I was able to plant them out (after “hardening them off” for a week by setting the seedlings outdoors under an awning in partial shade, to acclimate them to the outdoor weather). A makeshift trellis made from wire mesh and pieces of bamboo, at the end of a raised bed with compost and some drip irrigation along the roots:

IMG_20170415_195339

They grew slowly and tentatively at first, only gradually climbing the trellis as single vines… but as the weather warmed up and they got their roots established, they exploded, covering the entire trellis edge to edge.

By July they’re pumping out hundreds of tiny, crisp vegetables that look like a miniature melon and taste like a cucumber injected with a bit of lime juice. There are several dozen in this photo alone if you look carefully:

IMG_20170719_193531

Close-up:

DSCF2559

We’ve been eating them raw straight off the vine (they’re especially good when picked just slightly below peak size), put some in salads, and I turned a few quarts into kosher-style dill pickles– lactofermenting them at room temperature in a 5% sea salt brine with dill and garlic from the garden as well as mustard seed and peppercorns (and in one case, some leftover brine from a previous Jimmy Nardello ferment). They worked well as pickles, keeping their crispness, and developing that nice half-sour pickle tang after 4 days fermenting at room temperature and a few weeks in the fridge…

IMG_20170720_230640

[the left jar is a new batch about to ferment, the right jar is pickled and ready to eat]

They work well as snacks, and I look forward to trying them as a cocktail garnish…


Preserving Citrus & Hot Peppers

4 Mar

Another winter weekend, another bout of citrus preserving.

First, citrus peels rubbed in sugar to extract oils and make an oleo saccharum, my favorite way to get flavor out of citrus. I tried both bergamot from Monterey Market and a mystery pomelo/citron hybrid(?) citrus from someone in our neighborhood. I was lazy about my usual careful cutting out of all pith inside the rind of the pomelo/citron since it didn’t taste especially bitter.

img_20170205_181912

I also wanted to try making black lemons / black limes— both whole meyer lemons and bearss limes from the back yard trees, boiled in very salty water for 10 minutes, then put in a dehydrator whole for 3 days (rather than sun-drying them over a month as would be more traditional– our rainy Oakland winter wasn’t cooperating).img_20170205_182004

The result, surprisingly, was very dry (almost brittle) limes and lemons with glossy black interiors and a slightly funky taste– it will be interesting to see if they are dry enough to truly keep without spoiling and add flavor to stews and cous cous…img_20170208_211200

Someone else gifted me some red and yellow rocoto peppers (capsicum pubescens), which were extremely hot but with a bit of fruitiness like a habanero. I dehydrated a few trays of them to grind into chili powder and filled another jar with them and a 4% sea salt solution, garlic, and mustard seed to see how they ferment:

img_20170205_182010

img_20170206_190836

The end result (including some whole limes packed in salt to make preserved limes, and a bergamot-rice vinegar shrub made from the oleo saccharum)– img_20170209_195354

Not shown, a “pomelocello” made with the pomelo/citron oleo saccharum, the juice, and cheap vodka.

Not bad for a weekend’s work. The dried rocoto pepper powder has already become a good go-to for chili, beans, and stew, and the bergamot-rice vinegar shrub makes a great non-alcoholic cocktail diluted about 1:6 with sparkling water.

Red Cabbage Sauerkraut

26 Feb

This batch of sauerkraut turned out especially good:

img_20170108_184132

I cut two heads each of savoy and red cabbage into long narrow strips, then sprinkled them generously with sea salt, let them rest, then kneaded them until juice was coming out and they were turning translucent. I added a decent amount of caraway seed and a handful of dried juniper berries, covered it with a few spare cabbage leaves, and weight them down with some ceramic weights– pushing the cabbage down into its own liquids. Then I just let it lacto-ferment in a crock on the counter for 3 or 4 weeks, tasting periodically.

The result was a moderately sour bright maroon kraut that still had some good crunch… I moved it to the fridge to slow further fermentation.

img_20170108_183800

So far it’s gone especially well with sausages and mustard, or with home-smoked brisket and fermented thai chilies on a taco…img_20170213_202350

img_20170207_204712

Fermented Green Chiles

12 Feb

My third, fourth, and fifth batches of fermented hot sauce:

IMG_20170108_171342_228.jpg

Two of them started as ways to preserve two bushes worth of green cayennes and Thai chiles (chilis? chilies?) from a back yard raised bed that got a later start in the season so didn’t turn red before the weather turned cool:

IMG_1864 (1).JPG

IMG_20161204_095049.jpg

I packed a jar full of green chiles with some mustard seed and garlic cloves in a 4% salt brine and let ferment for about a month at 60 degrees, then skimming off mold or anything floating on the surface, straining, tasting, and pureeing with some of the reserved probiotic brine to make a tangy, slightly umami hot sauce (no vinegar added). The cayenne in particular has more going on than just “hot”.

I do want to figure out a better blending / straining technique for the times I want a thin hot sauce that’s less like a chile paste.

Lacto-Fermented Hot Sauce

5 Feb

After reading an essay about Tabasco sauce, getting a Sander Katz book as a present, and taking a class at Preserved Oakland, fermented hot sauce was on my mind, and I like how my first batch (a blend of 4-6 week fermented jalapenos, Jimmy Nardello sweet peppers, garlic, and spices) turned out. In photos:

Jimmy Nardellos submerged in an 4-5% concentration sea salt brine with a few hot thai chilis, garlic cloves, black peppercorns, corianted seed, and brown mustard seed:

img_8046

Jalapenos, a few cayennes, and garlic and peppercorns submerged in brine:

img_7816

I left some peppers at room temperature for a few weeks, but also put some peppers in one of my temperature-controlled “fermentation fridges” (a mini-fridge retrofitted with a temperature controller, allowing me to hold it at 55-60F for a slow, long, 4-6 week fermentation even during warm weather). Also shown: a hard cider aging:

IMG_3647.JPG

Blending the various peppers and garlic and a bit of the drained now-probiotic / live cultures brine to make a fermented chili paste (or in a few cases, to strain to make a thinner hot sauce):img_3674img_3687

My understanding in more detail:

Traditionally, many cultures’ hot sauces were made through lacto-fermentation, the same general process behind sauerkraut, kimchi, half-sour pickles, and other live-cultured foods. Rather that using vinegar, this involves packing vegetables and spices in a salt brine, and letting a series of wild bacteria (most commonly from the skins of the vegetables) multiple and progressively transform the food and environment over the course of weeks to a few months.

There are good and bad bacteria (and molds and other undesirable microorganisms), so the name of the game is all about creating environments (salinity, acidity, oxygen or lack of oxygen) that favor the growth of the desired microorganisms and shut down the undesirables.

There are plenty of books about this so I won’t recap all the details here, but I’ve always found it fascinating. There’s not just one bacteria involved– one bacteria may thrive in a salty but neutral-pH environment and as it multiplies lowers the pH of the environment, making it more hospitable to a new bacteria that will then start to multiply and further lower the pH (shutting down the previous bacteria).

These intermediate modest-pH fermentation steps may produce strong, funky, and occasionally unpleasant smells that make you think it’s spoiling (mine did for about two weeks but then faded as fermentation progressed), and white cloudy yeasts and slimy fluids may also form from this complex colony of microorganisms. It takes some effort to get past a reflexive disgust– but given the right time and environment and vegetables well-submerged under the brine away from surface mold, these fermentations generally all end up dominated by lactobacillus, an especially low-pH-tolerant bacteria that defines lacto-fermentation and the particular (good-tasting) fermented vegetable tang. This web page has a more detailed step by step of the phases of fermentation and the microorganisms involved, and highlights how lactic acid bacteria are only present in small amounts on vegetables, but through this progressive environment change are favored to multiple and eventually take over.

There are a number of ingredients that also help prevent formation of mold and preserve the sauce, including traditionally spicy ingredients (garlic, hot peppers) as well as juniper berries and grape leaves– so fermenting hot peppers should be a bit easier than some other vegetables.

I took the approach of submerging peppers in a salt brine of about 4-5% (for every quart of water I used 2.5 Tbsp of a mix of coarse sea salt and a Japanese “moon salt” (also presumably a sea salt), but this is based on an estimated conversion between volume and mass— for future fermentations I used a scale to weigh out 4% salt).

I went through this roller coaster of smells, textures, and appearance on the first two batches of peppers– at 2-3 weeks they smelled fairly unpleasant, and I had to skim off some significant surface scum (mold?) on the room-temperature bottles (this seemed to be somewhat less of a problem for the ones in the 60F fridge). But after 4 weeks the smell had mellowed out, and at five weeks when I took off the weights and extracted the peppers they had a intense but pleasant kick of funky fermented tang, and made a good hot sauce when blended with the fermented jalapenos and garlic. I kept this hot sauce in the regular fridge after this to slow down any further fermentation.


Umeshu-inspired Pluot Liqueur

20 Nov

This one’s a success– a slightly sweet, tart, fragrant liqueur made from unripe green pluots (in the vein of umeshu) that stimulates the taste buds. Good on the rocks or mixed with a bit of soda water:

IMG_4033.JPG

This wasn’t where I’d started– instead, this summer I was thinking about how I loved the flavor of Japanese pickled plums* (umeboshi). While I didn’t have a line on green ume plums in the Bay Area, Hannah had a tree covered in green pluots in her backyard– perhaps those could be used similarly? And once I decided to pickle some pluots, why not also try to make a pluot liqueur along the lines of umeshu?


I started from a few magazine articles and blog posts, including Umamimart’s past posts about making umeboshi and umeshu, but unfortunately, the salted pluots didn’t turn out well (too salty, not enough flavor– the much-larger-than-ume pluots may have drastically changed how the salt worked its way into the fruit)… while the umeshu side project was a surprise hit.

Starting off, the right three jars combine green pluots, sugar, and vodka, trying out ratios of 50% of the pluot weight in sugar, 25%, and 10% (50% is more traditional, but I like things on the less sweet side).

img_6661

After just a few days– the pluots were changing color, and to my surprise, appearing to naturally ferment (based on the smell and the bubbling), even when submerged in alcohol. (The left jars are the less successful pluot umeboshi with red shiso leaf.)

img_6791-1

A month or two later, the liquid around the pluots continued to deepen in color, though the vodka taste was still a bit harsh:

img_7819

Everything I read suggested you want to wait at least 6 months (and even better, a year) for the flavors to mellow and meld. Five months later I couldn’t resist giving the 25%-sugar-ratio one a try, and all the harshness was gone– it was balanced, delicious, even a bit floral. I’ll stow away some bottles to age for the next 6-18 months, and look forward to drinking it over ice next summer when the weather turns warm again…


IMG_4063.JPG

* I realize that Japanese ume are not technically plums, but are a distinct fruit in the Prunus genus, along with plums and apricots

Homemade Gin from Foraged Sticks, Flowers, and Berries

13 Nov

This summer we spent 5 days backpacking in and around the stunning Caribou Wilderness.

img_8307

dscf1078

Inspired by my past brewing with foraged plants (yarrow, mugwort) in lieu of hops, an afternoon vermouth class, and following Pascal Baudar‘s photos– everywhere I looked I saw components for beer, gin, or vermouth– such as sap and wild yeast on freshly-opened pine cones:

img_8536

Or juniper branches and berries in gnarled old trees overlooking glacial ponds:

img_8544

dscf0944Back home a few days later, I unloaded my foraging bag:

img_8655

I decided to try to make both a vermouth (more on that in the future) and a gin, using only alcohol and things collected in the woods. Older methods of gin production involve alcohol that’s distilled so the vapor passes through a basket of botanicals (notably including juniper berries) before re-condensing– but not having a still I decided the simpler approach of a cold infusion into a neutral spirit was good enough.

I submerged eight potential components (coyote mint, pine sap, juniper bark and berries, green manzanita berries, fresh pine tips, not-yet-open pine cones, and yarrow flowers) in both jars of vodka and jars of fortified wine (white wine bumped to 19% ABV with brandy, for vermouth):

img_8672

I had no idea what would taste good and what would be distasteful or overly bitter, or how strong a flavor would come from of each component over time, so rather than throwing everything into a jar with vodka and hoping for the best, I decided to infuse each component separately and then blend them to taste later (accepting that I’d throw away some of the vodka from the stronger-tasting components). If I were planning to do this again, I could record the ratio that tasted good and then directly infuse that mix of components– but even then I’d expect every individual pine cone, branch, and handful of berries to be a bit different.

Every few days I smelled and tasted each jar, straining them at anywhere from 3 days to 4 weeks as flavors developed and before they got too bitter. The pine sap smelled and tasted horrible within days so I poured it out, but everything else produced a distinctive and interesting (if sometimes harsh or intense) flavor.

Finally, about three months later, I tasted each of the infused vodkas again side by side. Some had taken on significant color:

img_3736

I tried a few different mixtures at thimbleful scale to balance components with powerful aromas and/or tastes, and found a nice ratio that relied heavily on juniper berry and green manzanita berry, with a moderate addition of pine cone, yarrow flowers, and juniper branches, and just a touch of pine needles (harshly pine-y) and coyote mint (a lovely mint but very strongly flavored).

Without a re-distillation step it’s not transparent, but I think this is an attractive bottle of homemade alcohol– and it will always remind me of walking through those woods with a compass:

img_3813