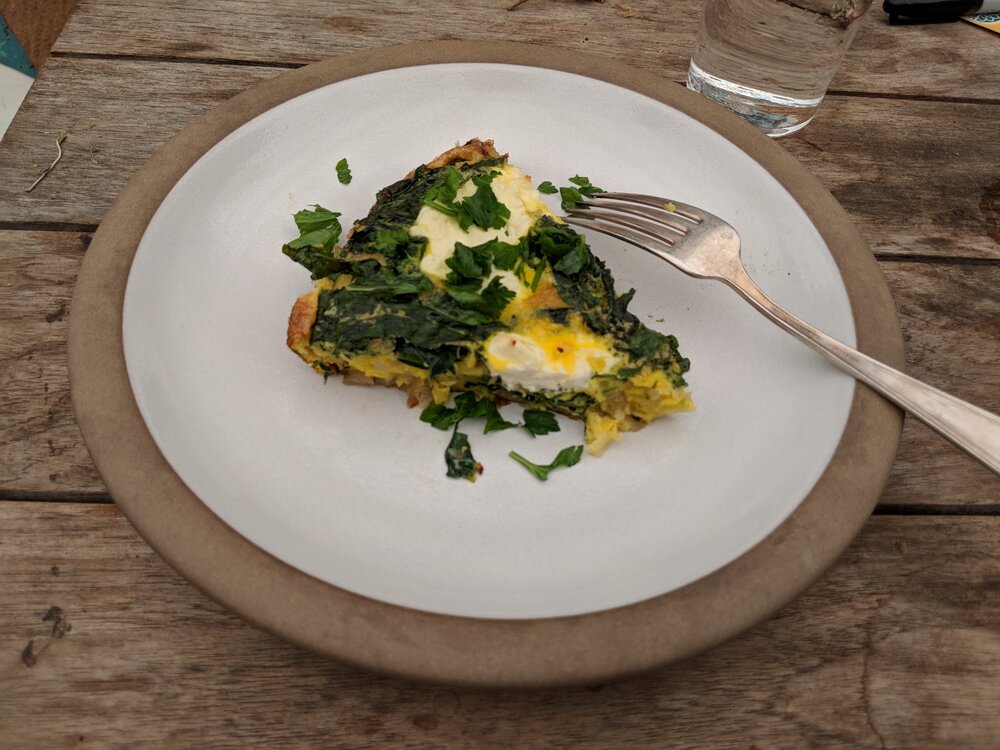
Archive | favorites RSS feed for this section

Trout Roasted in Fig Leaves, Succotash

25 Jun

An excellent and relatively easy dinner.

Preheat the oven to 400°F. Salt trout, let it rest 15 minutes, drizzle good olive oil over it, and wrap it tightly in fig leaves (it took about eight big leaves from the tree in our yard, overlapped, to fully enclose two packets without holes). Bake it for about 20 minutes until flaky and done.

The fig leaves gave off an excellent fruity aroma as they roasted and when we tore them open, and the trout itself was moist, soft, and delicious (with almost a hint of coconut flavor from the leaves? is that crazy?)

The succotash was made from fresh-shelled cranberry beans (boiled in well-salted water), mixed with sautéed onions, dragon tongue beans, zucchini, and corn. Then at the end we mixed in some soft cheese, green coriander seeds, and basil.

Tandoori Chicken in a Charcoal BBQ

30 Nov

Earlier this fall I made some delicious tandoori-style chicken for an Indian-themed dinner party. This may be the best-tasting chicken I’ve cooked in a long time.

IMG_20190922_190114

I figured, I have a kamado-style ceramic-walled charcoal grill / smoker that can easily get up to 700 degrees F (which I’ve used to make pizza in the past)– there must be some way to use this as an approximation of a tandoor. I did some reading, and as often seems to be the case, there was an article by Kenji on Serious Eats on this very idea.

The keys seemed to be thigh meat (delicious, doesn’t dry out as easily if the temperature gets a bit high), heavy use of a thick yogurt-based marinade (continues to shield the surface and provide moisture), and fast cooking in a hot-on-all-sides grill/oven, above open fire that can give it some char.

For twelve people (as part of a feast with many other dishes), I made about 5 lbs of boneless, skinless chicken thighs.

The marinade:

Grind these spices together:

  • A few spices toasted in a skillet for 1-2 minutes:
    • 4 T cumin
    • 4 T smoked paprika
    • 2 T “extra bold Indian coriander seed”
  • 2 tsp turmeric
  • 1 tsp cayenne
  • 2 T achiote powder

Add:

  • 16 cloves garlic, crushed
  • 4 T ginger (microplaned)
  • 1 cup lemon juice
  • 4 cups yogurt
  • 1/2 cup(!) salt

The marination:

I slashed the surfaces of the chicken thighs deeply with a knife (to make it easier for marinade to penetrate), and marinating them in the fridge for about four hours:

IMG_20190922_132007

The tandoor:

I started a fire in the grill/smoker about an hour before cooking, to give it time to burn down the coals and heat up the entire chamber, I had the grill temperature stable around 600-650 degrees by the time I was ready to cook. The chicken did end up sticking a bit– I could have better-oiled the grill.

I pulled the chicken out of the fridge 15 minutes before cooking to let it warm up a bit, then put the skewers (still dripping with the thick yogurt sauce) on the grill and lowered the top so they’d cook from all sides…

IMG_20190922_182218

At this high temperature, they only took about 12 minutes to cook (I flipped them after 7 minutes, then checked the appearance and internal temperature a few times after that– looking for about 165 degrees for these thighs). Beautiful!

IMG_20190922_183902

With such a short cooking time, some of the tangy spiced yogurt was still moist on the outside of the chicken– different from what I’m used to in restaurants, but delicious– and the chicken thighs hadn’t dried out at all.

We served this with a pile of lemon wedges and fresh cilantro, alongside freshly-made garlic naan, saag paneer by H with homemade paneer, deep-friend pakoras, and multiple types of daal and homemade chutneys– a great evening eating outdoors with friends…

Cooking Fresh Beans

10 Nov

Every year I grow a few varieties of fresh shelling beans, and when I’m lucky I find them at the local markets as well.

A common even weeknight-fast way of cooking them is to combine beans, salty water, a splash of olive oil, some aromatic (half an onion, a shallot, a clove of garlic), a whole dried hot pepper pod (without seeds if I want it to be less spicy), and a bay leaf.

IMG_20191003_194011

Just low-simmering this combination for 25-45 minutes until creamy-soft (time depends on the particular beans, their size, and their maturity) and then draining and dressing with good olive oil is consistently delicious.


Pizza on a Charcoal BBQ

18 Nov

(quick notes, mostly jotted down to remember what worked well)

My third try in three years, and the most successful (I got the grill up to 700 degrees, which I’m sure helped):

IMG_8469

Grill setup: plenty of charcoal below, all air passages cleared of ash, and a pizza stone (porous side up for my glazed/porous stone) raised on two bricks to bring the pizza close to the hot lid of the ceramic grill. I let the charcoal burn for 90 minutes with the lid closed to get the entire grill up to 650-700 degrees (when I tried making a pizza earlier, it burned on the bottom before it fully cooked on the top– I think because the ceramic grill lid wasn’t hot enough– I could also try further raising the stone next time).

IMG_20181103_173221

The dough recipe is down at the bottom. After letting it rise overnight in the fridge, I pulled it out about an hour before the grill was ready and rolled out each crust on a floured board before transferring it to the peel (on a layer of coarse cornmeal), rubbing olive oil into it, sprinkling a little salt onto it, and then topping it.

IMG_20181103_171743

Each pizza only had to bake for 3 or maybe 4 minutes when the grill was at peak temperature (later in the evening the charcoal burned down and the grill dropped to 500-550 degrees– the pizzas still came out pretty well).

IMG_8463

IMG_8470

IMG_8471

IMG_8473

We made 6 different pizzas in one evening for a small cocktail party with a group of friends– success!

Dough recipe (6 small pizzas, enough for 6-9 people):

  • 690g white* flour
  • 255g whole wheat flour
  • 21g sugar
  • 15g salt
  • 15g yeast
  • 690g lukewarm water
  • 48g olive oil

(*usually King Arthur bread flour, but this time I used a 50/50 mix of bread and all-purpose because I ran out of bread flour)

Mix all the dry ingredients except the yeast.

Make a small depression in the middle of the dry ingredients and add the yeast there.

Gradually pour the water/oil mixture into this depression, stirring in a small circle to dissolve the yeast and to gradually incorporate the flour into this.

Turn the (quite wet and sticky) dough out onto a floured countertop and knead a dozen times.

Place in an oiled bowl, cover with plastic wrap, let rise overnight in the fridge (take it out at least 15 minutes before making pizzas and divide it into 6 balls).

Corn Muffins 5 Ways (from Backyard Corn)

23 Jun

(from last winter) What do you do when you grow five different varieties of colorful heirloom corn in the back yard?

IMG_20171028_172409.jpg

Grind them into cornmeal and make individual corn muffins, of course:

IMG_20180104_214506.jpg

Some day I’ll type up some notes on the corn growing itself– it was very fulfilling and an interesting challenge (especially the hand-pollinating due to the small area under cultivation and desire to keep separate varieties from cross-pollinating).

We couldn’t really taste a difference between muffins made with different corn (as expected, I suppose), though in a blind taste test H and I did both pick out the muffin made with Oaxacan Green corn as our favorite and a bit “nuttier” than the others… and we tasted a big difference between our freshly-ground dried corn (any variety) and cornmeal-from-a-box.

Caramelized Garlic, Kale, and Cheese Tart

28 Jan

The caramelized garlic tart in Ottolenghi’s Plenty is very good. I recently made a greener tart inspired by it that combined:

  • A basic butter pie crust, pre-baked until golden
  • Three heads of heirloom garlic cloves, caramelized with a little red wine vinegar (following the general process in the recipe above)
  • Gruyere and goat chevre
  • A whole bowlful of kale from the winter garden, chiffonaded and wilted / cooked down for a few minutes in a skillet
  • 4 eggs and a little milk and yogurt to fill the tart

It worked well for breakfast the next morning, too…

Hand-churned Strawberry Ice Cream

22 Jul

For years, I’ve been thinking back to the strawberry ice cream of my youth– made from strawberries picked down the road that day and painstaking hand-cranked by kids and adults on the front porch in a wood bucket leaking salty ice.

I finally had a chance to try to recreate it, at a 4th of July BBQ we threw for a few dozen friends and their kids, and it was all I remembered and more:

IMG_2835 (1)

If I’m going to make strawberry ice cream, the ingredients had better be good– so we took a day trip down to the U-Pick at Swanton Berry Farm to fill a flat with about 9 pounds of berries:

IMG_20170703_154016

I wanted to let the strawberries shine, so after some poking around online to see what others have done I decided to stick with a simple Philadelphia-style ice cream base (cream, milk, and sugar– no eggs). Since the strawberries will bring along a lot of water on their own (I pureed them and passed them through a coarse strainer to take out some of the thicker pulp and some of the seeds), I left out the milk and went with pure half-and-half.

IMG_20170703_224750IMG_20170703_235306

I also took a hint from the Serious Eats recipe and swapped in a little corn syrup (non-HFCS) for sugar, to reduce the sweetness and add a sugar that wouldn’t easily crystallize.

My final recipe, for 3 quarts of ice cream base (which churned up into a nearly-full 6-quart container of ice cream), was:

  • 4.5 lbs of picked-just-the-day-before strawberries, hulled, pureed, and strained (producing about 5 cups of strawberry juice)
  • 3 pints of Strauss half-and-half
  • 2 1/4 cups of white sugar
  • 1 cup of Karo light corn syrup
  • about 1 tsp of salt

I whisked these together, let them chill in the fridge overnight, then churned them surrounded by ice and many cups of salt*… and the end result was magical. Creamy, not too sweet, no ice crystals, and just the pure cold essence of a summer strawberry.


* Technical sidebar: The salt is there to lower the freezing temperature of the ice and help it melt (it’s really the phase change from solid ice to water that matters). Briefly: salt reduces the freezing temperature of water -> more ice melts -> large amounts of energy (heat) are sucked out of the surrounding environment during the phase change from ice to water. This cools the ice cream far more rapidly than just a cold bath of for example antifreeze (or pebbles, or anything without a phase change) at the same temperature would.

It also took me a while to find a good-quality hand-cranked ice cream maker– most of the ones for sale these days have plastic gears or are small KitchenAid-accessory ice cream makers that require you to pre-freeze a special container first (and I don’t currently own a KitchenAid). I wanted a solid, metal-geared (ideally, stainless steel) machine, both for the nostalgia factory, and to make 6+ quarts of ice cream in for a party in one go. I looked at used ice cream makers on craigslist and ebay, but finally found what I wanted through Lehman’s, an Amish supply company.

It took more elbow grease than I remembered (even with me expecting that to be the case)– perhaps 30-40 minutes of solid churning between three adults and three enthusiastic kids. But the result was worth it, 100%.

Lacto-Fermented Hot Sauce

5 Feb

After reading an essay about Tabasco sauce, getting a Sander Katz book as a present, and taking a class at Preserved Oakland, fermented hot sauce was on my mind, and I like how my first batch (a blend of 4-6 week fermented jalapenos, Jimmy Nardello sweet peppers, garlic, and spices) turned out. In photos:

Jimmy Nardellos submerged in an 4-5% concentration sea salt brine with a few hot thai chilis, garlic cloves, black peppercorns, corianted seed, and brown mustard seed:

img_8046

Jalapenos, a few cayennes, and garlic and peppercorns submerged in brine:

img_7816

I left some peppers at room temperature for a few weeks, but also put some peppers in one of my temperature-controlled “fermentation fridges” (a mini-fridge retrofitted with a temperature controller, allowing me to hold it at 55-60F for a slow, long, 4-6 week fermentation even during warm weather). Also shown: a hard cider aging:

IMG_3647.JPG

Blending the various peppers and garlic and a bit of the drained now-probiotic / live cultures brine to make a fermented chili paste (or in a few cases, to strain to make a thinner hot sauce):img_3674img_3687

My understanding in more detail:

Traditionally, many cultures’ hot sauces were made through lacto-fermentation, the same general process behind sauerkraut, kimchi, half-sour pickles, and other live-cultured foods. Rather that using vinegar, this involves packing vegetables and spices in a salt brine, and letting a series of wild bacteria (most commonly from the skins of the vegetables) multiple and progressively transform the food and environment over the course of weeks to a few months.

There are good and bad bacteria (and molds and other undesirable microorganisms), so the name of the game is all about creating environments (salinity, acidity, oxygen or lack of oxygen) that favor the growth of the desired microorganisms and shut down the undesirables.

There are plenty of books about this so I won’t recap all the details here, but I’ve always found it fascinating. There’s not just one bacteria involved– one bacteria may thrive in a salty but neutral-pH environment and as it multiplies lowers the pH of the environment, making it more hospitable to a new bacteria that will then start to multiply and further lower the pH (shutting down the previous bacteria).

These intermediate modest-pH fermentation steps may produce strong, funky, and occasionally unpleasant smells that make you think it’s spoiling (mine did for about two weeks but then faded as fermentation progressed), and white cloudy yeasts and slimy fluids may also form from this complex colony of microorganisms. It takes some effort to get past a reflexive disgust– but given the right time and environment and vegetables well-submerged under the brine away from surface mold, these fermentations generally all end up dominated by lactobacillus, an especially low-pH-tolerant bacteria that defines lacto-fermentation and the particular (good-tasting) fermented vegetable tang. This web page has a more detailed step by step of the phases of fermentation and the microorganisms involved, and highlights how lactic acid bacteria are only present in small amounts on vegetables, but through this progressive environment change are favored to multiple and eventually take over.

There are a number of ingredients that also help prevent formation of mold and preserve the sauce, including traditionally spicy ingredients (garlic, hot peppers) as well as juniper berries and grape leaves– so fermenting hot peppers should be a bit easier than some other vegetables.

I took the approach of submerging peppers in a salt brine of about 4-5% (for every quart of water I used 2.5 Tbsp of a mix of coarse sea salt and a Japanese “moon salt” (also presumably a sea salt), but this is based on an estimated conversion between volume and mass— for future fermentations I used a scale to weigh out 4% salt).

I went through this roller coaster of smells, textures, and appearance on the first two batches of peppers– at 2-3 weeks they smelled fairly unpleasant, and I had to skim off some significant surface scum (mold?) on the room-temperature bottles (this seemed to be somewhat less of a problem for the ones in the 60F fridge). But after 4 weeks the smell had mellowed out, and at five weeks when I took off the weights and extracted the peppers they had a intense but pleasant kick of funky fermented tang, and made a good hot sauce when blended with the fermented jalapenos and garlic. I kept this hot sauce in the regular fridge after this to slow down any further fermentation.


Tacos, Tlacoyos, and other street food of Mexico City

22 Jan

In late 2015 I took a week-long vacation to Mexico City, and spent much of that time eating tacos, tlacoyos, and other food around the city (whether in restaurants or at street stalls).

I’d done some initial reading on others’ experiences with the tacos of Mexico city (e.g. Serious Eats 2014, Thrillist 2015, The Mija Chronicles) which gave me a list to start from, and I also spent a day just biking around the city looking for street food carts and taquerias. I can’t claim any deep Mexico City or Mexican culinary expertise as a one-week tourist with very poor Spanish, but I had a great experience and jotted down a lot of notes, for future trips or friends. A year later (when feeling under the weather at home one evening) I’m finally transcribing a few.

A quick summary of my favorites:

  • El Vilsito must-east al pastor tacos (evening/night only, Avenida Universidad in Narvarte)
  • El Jarocho tacos guisados (stew) on Tapachula at Manzanillo in Roma
  • A blue corn tlacoyo pop-up street stand I found on Av. Álvaro Obregón just West of Jalapa
  • Pop-up stall La Esquina del Chilaquil (or the corner of Alfonso Reyes and Tamaulipas) selling a “chilaquiles sandwich” (time it right– a line forms before 11AM and they will sell out)
  • Tacos Gus for more unusual tacos guisados (huitlacoche, chile relleno, etc) in Condesa / Hipódromo
  • El Califa bistec tacos and nopales (afternoon/evening, Condesa / Hipódromo)

THE VERY BEST

El Vilsito (neighborhood: Narvarte)

A++, best al pastor I’ve ever had (it’s not even close), beating my distant memory of the transformative first-amazing-al-pastor in Mexico a decade ago.

IMG_4956.JPG

Such crispy-edged, delicious pork. A nice piece of pineapple. A thin red salsa that covers it with a bit of heat and keeps it moist. M$14/taco (about US$1).

El Vilsito is only open in the evenings (and open until late)– they’re located in what by day appears to be a large auto garage / repair shop. It took a taxi to get here as it was a bit out of the way, on a strip that seemed mostly dark / closed other than it, but even at 11:30pm there were about 50 people milling about, ordering tacos from the three men working the spits, and more people arriving every minute by car, bus, foot– very bustling.

IMG_4954.JPG

IMG_4962.JPG

Blue corn tlacoyo street stall (unknown name, Roma neighborhood)

I’d read a travel diary that included eating excellent made-to-order blue corn tortillas at a street stall in this area, but I couldn’t find any photos or a name or map, so I biked back and forth over a 5-block grid looking for something that matched the description.

At the intersection of Av. Álvaro Obregón and Jalapa I saw a stand that looked promising, with a woman scooping balls of blue corn masa out of a bowl into a tortilla press… (specifically, here, on Av. Álvaro Obregón just West of the intersection, in front of a sign that said “Salon Mercurio”)

IMG_4832.JPG

IMG_4823.JPGI give this a strong A grade. They were making a few different things based on blue corn including tlacoyos, but I had trouble understanding the options so pointed and got something like a quesadilla with “chicharrones” (in this case meaning pork sausage and chunks of potato) that was delicious– the toasted blue corn really stood out (the cheese was overkill– next time I’d skip it).

IMG_4828.JPG

This was a busy but social stand, with people dropping by, ordering food and eating standing up, all while laughing, chatting, making jokes with each other. A number of people bought one to eat on the spot and then another 2-4 to go for friends or coworkers.

Taqueria El Jarocho (Roma neighborhood, on Tapachula at Manzanillo)

I gave this an A+ in my taco notebook (doesn’t everyone have a ‘taco notebook’?). They primarily serve tacos guisados (filled with stews), with enough filling that they give you  a second tortilla on top of it.

IMG_4798.JPG

I got three of them for M$36 each, but they were big– I could have easily only ordered one or two. The sausage and egg taco was good, but the other two were the stars of the show.

The chuleta y papa special was amazing– hearty chunks of slightly chili-spiced pork with chunks of potato. So good.

And the Mole Verde was an A+, with chunks of tender pork starting to come apart into fibers, potatoes, and a savory green sauce (with I think tomatillos, some ground nuts or seeds, and some flavorful but not very hot chiles).

The salsas were also excellent– the red was tomato-based and not very hot, but the green was a perfect instance of a bright green, very fresh/uncooked-tasting hot salsa– I wonder if it was as simple as pureed fresh jalapenos, onions, and a little oil?

VERY GOOD

Still some of the best tacos or street food I’ve eaten.

La Esquina del Chilaquil (“the corner of chilaquiles”, Condesa / Hipódromo)

This pop-up stand (when I visited, located on the South corner of Alfonso Reyes and Tamaulipas) sells a remarkable chilaquiles sandwich.

IMG_4916.JPG

But wait, you ask, aren’t chilaquiles already tortillas fried in sauce? They put that in a roll?

Even better– it starts with a soft roll with a crusty outside. Then they line it with a chicken breast pounded very thin, breaded, fried, and folded into a U, fill that with chilaquiles (very soft, tender chips soaked in either red or green sauce), and top it with cheese.

The chicken acts as a barrier between the sauce and the roll, keeping the bread from getting soggy and making this a very portable lunch. All for M$30. I preferred the red version but both were good.

Even before they arrive and set up a stall (around 11AM?) people start lining up down the block in anticipation since it can sell out. We got there just as they were arriving and waited about 40 minutes in line.

img_4906

El Califa (neighborhood: Condesa / Hipódromo, on Alfonso Reyes)

The bistec taco I ordered wasn’t messing around– just a thin, well salted, delicious piece of steak on a tortilla. It didn’t even need any toppings.

I ordered nopales (cactus paddles) and avocado to go with it not realizing I was ordering a plate of each…

IMG_4803 (1).JPG

Tacos Gus (Condesa / Hipódromo)

Tacos Gus had a long bar of more unusual guisados (stews) for tacos, including chile relleno poblano (a chile stuffed with cheese, topped with guacamole and cheese) and huitlacoche (corn fungus) that was very savory and musky. I’ve give these both an ‘A’.

IMG_4548.JPG

GOOD

Tacos La Cazuelas (La Juárez neighborhood)

This was at the intersection of Havre and Londres, roughly here— there were two taco stands adjacent to each other,  but the one I ate at was closest to the corner with Londres.

At 4pm they were almost out of meat, so I got the chorizo, which was excellent– not too fatty, just a nice smoky red sausage.

IMG_4853.JPG

El Tizoncito Tamaulipas (neighborhood: Condesa / Hipódromo)

There are multiple El Tizincito locations within a few blocks of each other, but this specific one was recommended by our B&B host as the best of them. Looking back at my scribbled map and the geotag on some photos I took, I’m pretty sure it’s the one here, on the corner of Tamaulipas and Campeche, with a blue awning, (on the same side of the street and just 1 block west of El Kaliman).

I had a late night snack, with a good al pastor and a michelada (which came with ice, but I took the risk). Overall I’d say good tacos with a good salsa array. I spent M$120 total on dinner including the michelada.

IMG_4481.JPG

El Kaliman (neighborhood: Condesa / Hipódromo)

This is on Campeche at Ensenada, about here, with an orange awning and orange chairs. It was decent– I’d give it a B+ on the pastor (I didn’t think the beef adobado was as good). A nice casual inexpensive place for al pastor… and you can get any of their beers as a michelada.

img_4284

Another unknown-name pop-up street food stand on Av Moliere at Avenida Homero in Polanco (roughly here):

img_4678

There seemed to be a line of regulars waiting for them to set up, so we stopped and got a fried tortilla filled with pork and topped with cheese and a hot fresh green salsa. It was a decent midday snack.

NOT RECOMMENDED

El Farolito (Roma neighborhood on Alfonso Reyes)

At 2:30 pm no customers were inside, and employees were sitting idle, while a nearby taqueria was busy– this seemed like a bad sign so I skipped it.

Tacos Alvero Obrega (Roma)– I had a bad, flavorless al pastor taco and the stand felt dirty (and they weren’t wrapping everything in plastic bags the way they did at most stands).

IMG_4842.JPG

Overall, this was a great trip for tacos and street food…

Still to be posted: Mexico City Food Pt 2 (I wrote up notes a year ago but still need to dig up a few photos for it).

BBQ pork tacos with smoked salsas

1 Jan

For a small New Year’s Eve party, a meal cooked primarily in the smoker (tacos with pulled pork, homemade tortillas, and salsas made from smoked tomatillos and pineapples):

img_20161230_153839img_20161231_200607

23-hour slow-smoked pork shoulder:

  • A roughly 7lb chunk of pork shoulder (a.k.a. pork butt) from Niman Ranch
  • Dry rubbed with copious amounts of salt and mustard, smoked paprika, and black pepper and let rest in the fridge for 4-5 hours
  • Smoked very low-and-slow at 215-225F for 23 hours over lump charcoal with some fist-sized chunks of apple and pecan wood for smoke, until the internal temperature was in the 195-200 range (for overnight smokes I have a ‘baby monitor’-style wireless temperature probe I rest on the bedside so an alarm will ring and wake me up if the pit temperature gets too high or low and I can adjust the airflow or add fuel)
  • No intermediate basting, mopping, foiling, etc– just keeping it simple
  • Wrapped in foil and let rest for 45 minutes
  • It was so tender I could pull off strands by hand, and with a nice ‘bark’ and smoke ring…

img_20161231_134805It didn’t even need any sauce– I just squeezed a few limes over it.

Smoked tomatillo salsa, a puree of both smoked and raw ingredients:

  • 8 large tomatillos, smoked/roasted at about 225F for two hours
  • 3 cloves garlic
  • 1 whole jalapeno
  • 1/4 of a large white onion
  • Juice of 1/2 a lime
  • 1 Tbsp sugar
  • Salt and minced cilantro to taste

I’ve tried a few ways of using smoked tomatillos and this is the highlight for me– I’ve even frozen excess in ice cube trays to save for later:

IMG_20161217_102407.jpg

Smoked pineapple salsa:

My friend judit turned me on to how well smoking treats pineapple– the low slow cook caramelizes it, and this sweetness helps balance the woody smoke.

I started by slicing two pineapples into discs and smoking / roasting them at 225F for two hours (at the same time as the tomatillos and pork– in the initial, smokier two hours). I pureed:

  • One of the pineapples
  • 4 cloves roasted garlic
  • juice of 1 lime

And then added for texture/contrast:

  • The other pineapple, somewhat coarsely chopped
  • 1/4 of a red onion, finely chopped
  • salt to taste

The meal turned out really well, if I may say so myself.

Plus, we had a lot of tomatillo salsa and pulled pork left over the next day for breakfast…